PAGES

Friday, October 26, 2012

I Like You To Meet Keli and Olive


Today I bring you an Image Flashback from McMahon Five Designs.  I fell in love with this image the first time I saw it and I know you will too.  So without further delay I like you to meet Keli and Olive.  Just look at that adorable puppy face!
Keli and Olive_Final
For the first time I picked out the paper first and then colored the image. Boy it sure made it easy to match the image to the paper. The paper is from a 6x6 pad called Indie Bloom by Basic Grey. The card base is my favorite card stock by Neenah (Classic Crest Baronial Ivory 80#).  The digital image was colored using Prisma Colored Pencils. All embellishments (ribbon and crystal brads) are from my personal stash.  And I used the Spellbinders Nestabilities Beaded Ovals Dies for the Front and Inside of the card.  Plus I added a little bling to the die cut shapes with Stickles Glitter Glue (Lavender).  And the size of the card is a standard A2 size.  Quite a change for me because I usually make 5-1/2” or 6” square cards.  And I love how it  went together so easily using a smaller card base.  I really kept it simple this time.  And I think its one of my favorites too.  Its that puppy face that got to me :)
Stop over to the M5D Blog and check out the other projects by the Design Team.  Lots of inspiration to influence your creativity.  Thank you for stopping by and hope my small contribution from my creative side of my brain boosted your creative side of your brain. 
 
Signature for Blog

Friday, October 19, 2012

FYI Blog Candy


blog hop

I will be giving away 10 high quality card stock papers.  And on the back of each piece is a template that you can cut out and make up to use for personal gifts or use them to decorate a small table, etc.

This is the template you will be getting:

BagwithHandle_Template Instructions_Fran

Here is one made up.

Fall Theme Bag with Candy Display1

Each paper is a different theme except for two of the papers.  The two plain papers are actually chalk board paper by DCWV and you can decorate them with chalk.  Really cool paper!  Some of the other papers are by Mariposa, Tim Holtz,  DCWV, Baby Steps by atd, and K&Company. The paper was cut down to an 8-1/2” by 11” size for printing purposes.  The extra paper that was cut off you will get also to make embellishments our of them for each bag.  You will receive the instructions seen above in the packet too.

If you are interested in winning this packet of beautiful papers to make the cute bag (and I hope you are) all you have to do is leave a comment on my blog on the weekend of the Cutters Creek Holiday Blog Hop.  And at the end of the Blog Hop I will count in the order the comments were received and using the Random Number Generator by Random.org to pick the winner.  I will announce the winner on my Blog so come back and check to see if you won!   One more favor I like to ask of you if you are not a follower of my blog please sign up. 


fran red

. 

Tuesday, October 16, 2012

It’s That Time OF The Year…..

 
When we start thinking about all the holidays that are coming up.  My project today can be for any Fall Theme holiday like Halloween or Thanksgiving.  It depends on the type of elements you use.  My project leans more to a Fall Theme where you can use it for that very special Trick or Treat person in you life.  Or it can be used for favor bags if you are hosting a Thanksgiving Dinner.  It has a formal flair to it because I just love making flowers and so I added a flower using the Spellbinders Rose Creation Die (S5-050).  I cut the flower out using my Ebosser cutting the  flower petals and leaves in one pass.   Really easy peasy!
 
Instead of making a rose out of it I just layered the petal layers and attached them with a pumpkin eyelet and brad. Then I sprayed the layers with with water and scrunched them tightly. I used my heat gun to dry the layers and then separated each layer gently so they would not tear.  I held the layers together with a small pumpkin eyelet in the center and then added a tiny brad to hold it all together.  I attached the flower to the bag/box by punching an 1/8th” hole to the bag/box and slipped the brad through and secured it in the inside of the bag.   Once the flower was all dried I dabbed the edges with Stickles (Orange Peel). I used a small paint brush to paint on the stickles to the edges of the petals.  I used Distress Stickles (crushed olive) on the edges of the leaves. I  creased the leaves and used Distress Ink Pad  (Pine Needles) on the center crease. Thanks Tee for this great idea you shared on one of your videos.
 
(click on photos for larger view)
Fall Theme Bag with Candy Display1
 
Flower Close-up_Fall Theme Bag
 
Fall Theme Bag_Empty

NOTE:  The template was printed using my printer on card stock (8-1/2 by 11”) and I printed the diagram of the template on the wrong side of the paper.  This way you will not see the black lines on the good side of the paper.  If  by chance you use double sided designed paper you can color the lines to blend with the paper.  This can be done using any imaging program like Photoshop, Paint Shop Pro, Gimp, etc.  And I would be glad to help you if you have any questions.  You can direct your questions to me privately at francesb100@gmail.com.
You can also request  the template by going to my blog on the Templates Page.

I hope I have inspired you in some way.  And thank you for stopping by.

Fran

Saturday, October 6, 2012

World Card Making Day


Today is World Card Making Day and I wanted to make a card for all the oncology nurses at the treatment center where I go for my treatments.  A card surely isn’t enough to tell these angels how much they mean to me.  And how many times they gave me hope.   And especially for all the good care I get from them.  To me they are my angels on earth.  So I chose today to share with you the card I made for them.

Nurse Front View

Nurse Side View

(You can click on the photos to get a larger view.)

The digital image is by Mo Manning.  The card base I used Spellbinders Mega Nestabilities (Curved Rectangle).  I used the largest rectangle to make the card and the layered rectangles for the image and the inside of the card.  I used my eBosser to make the card and the layers.  The eBosser will cut and emboss all at the same time.  So easy and such detailed embosssing.  I love that machine! The paper I used to cut out the white rectangles and for the image is by Neenah (great for Copic markers and Prisma colored pencils).  I colored the image using Prisma Colored Pencils.  And the floor effect under the nurse’s feet was shaded with a gray shade and then added a little Stickles for emphasis.  Its really a cool effect.  The flowers are by Prima.  And the ribbon is seam binding dyed using distress inks to match the card base.  And then added some pretty pearls by Recollection.  You cannot tell very well from the photo but the pearls are a very light blue. 

I hope my card has given you some inspiration to make a card today to honor World Card Making Day. 

Hugs, Fran

Friday, October 5, 2012

Happy Pumpkin Day


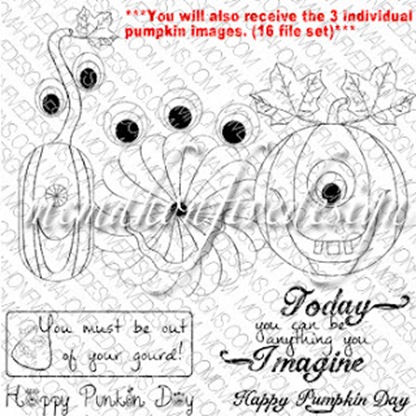
Today I did a card for McMahon Five Design using one of the cutest Halloween digital images. I had so much fun coloring the images and just went wild with the glitter too.  And added some WOW! Embossing powder to the sentiment.  Below the photo are all the details about how I created my card.   The image below discusses the image I used plus you get a total of 16 files in this grouping of digital images.  Now that is a great deal!!!

Pumpkin Friends JPG and PNG

pumpkin_digital_stamp_wm

Happy Pumpkin Day Card Front View2

Check out those crazy eyes!

The two pumpkins were colored using Prisma colored pencils using Neenah Paper. The Gourd in the center was paper pieced using a texture paper than colored lightly with Prisma color pencils. All the glitter is Stickles Glitter Glue.  The card base was made from Neenah Paper.  And the web frame was cut using my Cricut Expression.  I also sprayed the web frame with Silver Glitter Dust by Therm-O- Web. The spider was also cut using my Cricut Expression and then added some glitter for his nose and feet.  And for his eyes I used Liquid Pearls. The sentiment is part of the 16 files you will get with this digital package.  Below is a close up of the sentiment.  I printed the sentiment on cardstock using my printer and while the ink was still wet I covered it with WOW! Silver Embossing powder.  And then used a heat gun to melt it.  The background for the sentiment is just a torn piece of cardstock and the edges were embossed to match the sentiment.

Happy Pumpkin Day Saying Close up

I hope you liked what you saw and hopefully gave you some ideas on how you like to create your Halloween cards.  And if you want to see more of what the other Design Team Members did check out the M5D Blog If you have any questions about my project you can contact me at francesb100@gmail.com.  Thank you and have a wonderful day!

Fran

Saturday, September 29, 2012

Paint Dabber Resist Tag


I’ve been wanted to use my paint dabbers for a while now and I watched a Tim Holtz video where he did a paint dabber resist. I didn’t want to go all crazy and use nothing but paint dabber paints so I chose one of my favorite colors from the Paint Dabber colors called Citrus.   The actual product is called Adirondack Acrylic Paint Dabber and Citrus comes from the Brights Collection.  Because it was my first time I went a little easy on myself and chose to make a tag using Ranger Craft Tags #8 manila.  I chose to use glue two of them together for more stability.

I took one of my large background stamps and covered it with the Citrus acrylic paint dabber and stamped the background design on the tag.  Then I used a few Distress Ink Pad colors – Spiced Marmalade, Vintage Photo, and Pine Needles.  On the front of the tag I covered it with the spiced marmalade and vintage photo distress inks.  Then I took a paper towel and dampened it with a little water and wiped the distress inks off where the Citrus acrylic paint was stamped to remove the distress inks.  So easy to do and what a neat effect too.  Then I took a few other stamps I had in my stash and inked them with Memento Tuxedo Black ink and stamped all over the tag in various directions to give it a vintage flair. 

The next thing I did was take a tag which was not usable and tore two corner pieces off of it and glued them to the top and bottom corners of my tag.  I stamped them and also used the same colors of distress inks on them.  On the torn edges I covered them with Versa Mark and then added WOW! Embossing Powder in Metallic Gold Rich.  Took out the heat gun and melted the embossing powder. The look is really different because the edges were torn.  Then I added a couple elements (ticket, feather, and leather look ribbon) to finish off the tag.  Here are the photos of the completed tag.  Let me know what you think.

Paint Dabber Tag

WOW Tag

WOW Embossing Powder View

WOW Embossing View 1

WOW Embossing Powder View

WOW Embossing View 2

Distressed Ticket & Feather View

Ticket and Feather View

Thank you for stopping by,

fran red

Wednesday, September 19, 2012

HAPPY FALL!


I bought this unique paper made out of real wood from McMahon Five Designs.  And I’ve been meaning to make a project using it but I could not think of a theme where the wood paper would make all the difference.  Then it hit me!  I will do a Fall Theme.

Here is a photo of the card.  Just click on the photos to get a closer view.  Below the photos are all the details of how I made the card.  And supplies used purchased from Cutters Creek to get the final look.

Happy Fall_Front View

Happy Fall-Side View

The card base is Neenah Classic Crest Cream 80#.  The top layer of wood paper covers the entire front.  Then I used another layer of wood paper about two-thirds of the card front.  I embossed it using a Cuttlebug Embossing folder (Leafy Branch A2) and my Craftwell eBosser.  Then I used Forest Moss Distress Ink pad to color the wood embossed paper.  I used a large leaf stamp and stamped three leaves on more of the wood paper.  I used two shades of Distress Ink pads (Pine Needles and Spiced Marmalade) and distressed the leaves.  Now here is the best part.  I wanted to use a cursive style font for the sentiment (Happy Fall).  I chose two different ones.  And used both of them. I had no clue if my Cricut Expression was going to cut the letters out using the wood paper because the font was curly on the ends of each letter.  Well to my surprise and only making one mistake (human error) it cut the letters out of the wood paper perfectly.  I removed the letters and distressed them using Spiced Marmalade Distressed ink pad.

The inside of the card is also decorated with wood paper using my Classic Scalloped Circles Large (6 dies) by Spellbinders Nestabilities and the Craftwell eBosser.  They cut out perfectly using the prescribed sandwich as indicated in the manual.  The inside gives the illusion that there are three scalloped circles.  But the top portion was made using two different size scallop circles to get a scallop frame/border.  I also distressed the edges with Orange Marmalade and Pine Needles.  Added some Orange Peel Stickles to the scallops.  I left the center in the natural wood color for stamping the sentiment.

Happy Fal_Inside View


And I sprayed the front and back of the card with both Iridescent and Gold Glitter Dust.

Note:  If there are any supplies used that are not currently available at Cutters Creek please contact Kim Bush and she may be able to special order it for you.  Thank you for stopping by.


image

Sunday, September 9, 2012

Feel Better Kiddo!


Today I bring you a cute card for a little boy who is feeling under the weather.  And what do you think would make the little boy feel just a tiny bit better?  Well I thought maybe some candy coated chocolate treats.  And the treats are in special tubes (3) just for him.  Oh and did you see his little doggie he isn’t feeling good either Sad smile They both have a slight fever.  Do you think some doggie treats will make Fido feel better?  I hope so!  Oh and the little boy and the chair is on an action Wobble.  It is so darn cute when you touch the image and it just wobbles.  How much fun will that be for the recipient.
Get Well Card For Little Boy with Treats
(click on photo to view larger)


Cutters Creek  Supplies Used:  Stickles Glitter Glue, Copic Atyou Spica Glitter pen, Action Wobble,  papers, tag, buttons and digital stamps are from my personal supplies.  The buttons were made using a Memory Box Die called Round Buttons, the digital stamp of the little boy and chair with pet dog was colored using Prisma Colored Pencils.  And the Digital sentiment stamp was created on the computer. The tag is by Spellbinders Shapeabilities (Ribbon Tags Trio). If there is anything you see here that Kim Bush of Cutters Creek does not carry in the store she may special order it for you.  All you have to do is contact Kim here.
Thank you for stopping by Cutters Creek Design Team Blog and viewing my latest project.
Butterfly 2 Signature2